Shaping is the final step, and arguably the most important, before cooking. Following this part 6 of the pizza school series, you’ll have everything you need to make amazing pizza. Take a look at the video and recipe below.
The shaping of a pizza is basically done by stretching the dough into a thin, round shape by hand. There are a many different ways to stretch pizza dough but in this article I’m going to show you a really easy way.

Not only is this way of stretching pizza dough really easy, it also makes an Authentic Neapolitan pizza. The shaping is arguably the most difficult part of the pizza making process and makes such a huge difference to the quality of the pizza.
The shaping affects the way in which the pizza cooks, as well as providing an excellent texture to the pizza. Contrary to what many people believe, shaping the pizza doesn’t just make it look nice!
In case you missed the other parts of this series, feel free to check them out below:
Once we’ve got our dough ready, we’re ready for the final part before cooking – stretching the pizza!
Keep reading to find out all about stretching. I think it’s possibly the most important step and one of the most overlooked. Don’t miss the details!
If you do want to skip ahead, you can use the page contents below. Also, you can come back to the page contents at any time by pressing the green button at the top right of the screen.
In the video below I show you an easy and authentic way to shape pizza by hand. There are a few keys to this method and the quality of the pizza depends largely on the attention to detail. It may seem difficult to start with but it becomes really easy once you’ve done it a few times.
When you get the hang of this technique you should be able to shape a pizza in about 30 secoonds or less! If you’re ready to go, feel free to click here to jump to the recipe .
In general, pizza should be stretched rather than rolled. Unlike pasta dough, pizza dough contains yeast (a leavened dough) which allows air pockets to develop in the dough.
These air pockets are what makes for the wonderfully light texture to the pizza. As the pizza cooks, especially at high temperatures, the air pockets expand.

Rolling pizza dough removes a lot of the air that developed during proofing. There are some pizza styles which require rolling but the vast majority of pizzas are hand stretched without a rolling pin.
Being the most traditional pizza, Neapolitan pizza is shaped by hand. The classic shape is round, very thin in the middle, with quite thick crusts. The crusts are light and airy due to the long prove and delicate shaping.
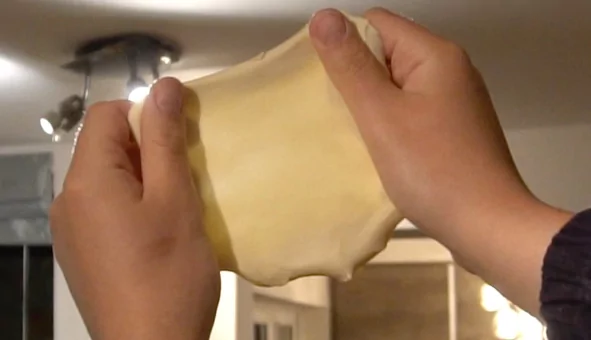
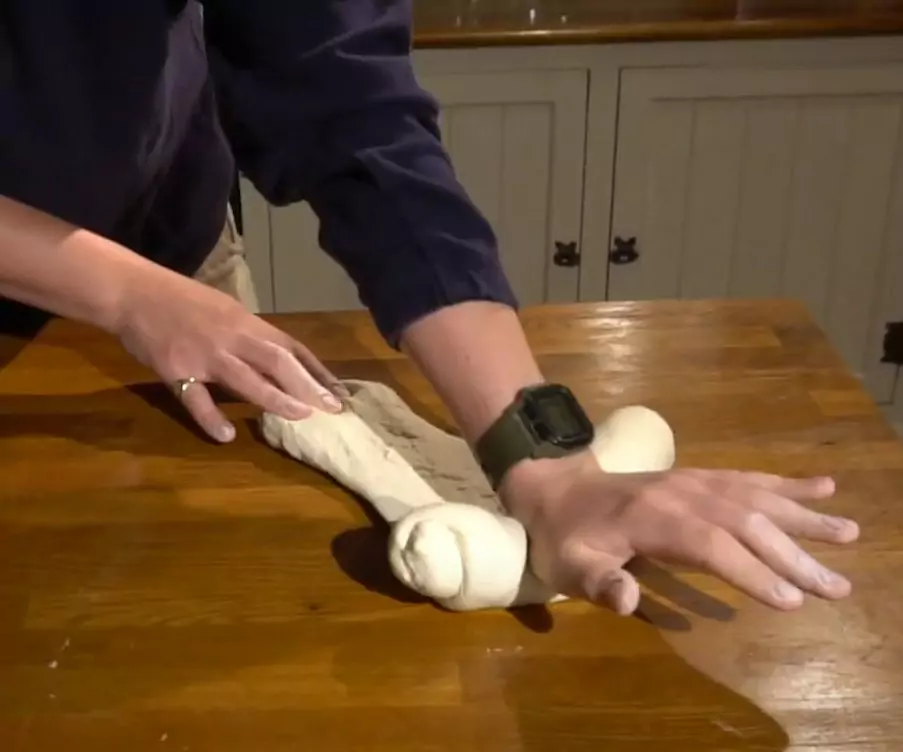
The key to achieving the classic Neapolitan pizza shape is to move as much air as possible from the middle of the dough to the edge (the crust). This forms the crust. Once the crust is formed, the pizza can be gently stretched until it is thin in the middle.
The easiest way to form the crust is by using the finger tips. Overlap the index fingers to achieve the shape shown below:

From there, you don’t need to move your fingers or wrists at all. Simply use your arms to press the air to the outside of your pizza dough.

Turn the dough regularly, repeating the process. This should set up the perfect Neapolitan pizza shape.

Once a nice round shape has been established and the crust has been formed, we can move onto stretching the pizza dough.
The most authentic, and in my view, easiest way is called the “slap” technique.
With one hand, hold the pizza down to the counter. With the other hand, stretch gently outwards.

Using the same hand, flip the dough onto your other hand.

In one motion, rotate the dough 90 degree whilst flipping the dough back over.


Repeat this process until you have achieved the desired thickness (quite thin). Stretching very gently and turning often ensures that we stretch the dough evely.
Try not to remove any air from the crusts during shaping but don’t worry if they shrink a little. They will expand as they cook in the oven.
Pizza dough breaking easily during stretching could be a sign of an underdeveloped dough. If your dough hasn’t been kneaded well enough, it will lack gluten development.
It is the gluten that gives pizza dough most of it’s strength, preventing it from breaking. However, if your pizza dough passed the windowpane test then this is unlikely to be the issue.
It is also possible that your dough is overproofed. A properly proofed dough should have doubled in size and be full of little bubbles. It should be soft and easy to stretch, but equally quite strong.
However, dough does loose some strength as it proves. A dough that is overproved will have contracted and will be difficult to stretch. If it does stretch, it will have a tendancy to break.
It is important to develop a feel for the dough, which will happen over time. Be careful when stretching to avoid your dough breaking. Try to work quickly but with soft hands.
Of course, the best way to avoid shaping issues is to start off with a perfect dough. But most of the time, we might notice there is an issue when it’s too late. But don’t worry, good results can still be achieved with less than great dough.

At this stage, it is generally too late to fix the problem. So rather than trying to fix the pizza dough, I recommend the following steps during shaping:
If it feels like your dough is difficult to work with, take more time during stretching. You may be able to patch up a small tear but in general, once a pizza breaks it is no good.
Don’t be tempted to load a ripped pizza into the oven. Cheese will probably leak onto your stone, burning it, and possibly even breaking it!

Stretch the dough gently and turn it often. This should help to achieve a good shape without risking any tears. Once you get good at it you should be able to do it quickly yet gently.
It is very difficult, if not impossible, to achieve a thin pizza with weak dough. However, you can still make a nice pizza, even if it is a little thicker than ideal.
Make the pizza as thin as you think you can before it tips but don’t go too far. If you are unsure, then stop strecthing. A pizza that is slightly too thick is better than one that is ripped.
Everytime you shape a pizza, you should add the toppings quickly and move it onto the peel as soon as possible. A stretched pizza left on the bench will stick after a short time. Once moved, this pizza will stretch again and may tear.

When working with weaker pizza dough, it is even more important to get your pizza on the peel and into the oven as soon as possible. The quicker we can get the pizza in, the less chance there is of it breaking.
If you are worried that your pizza may rip when transferring it onto the peel, don’t worry. One option is to shape the pizza on the peel itself. Whilst this method is not traditional, it is generally safer.

You will likely end up with a thicker pizza doing this. But as mentioned earlier, this is probably for the best anyway, given the weak dough.
With 00 flour:
Note: Caputo 00 pizza flour is an excellent option, especially for Neapolitan style pizza. It is one of the more widely available “professional” pizza flours. I have provided a link to it on Amazon below (a large chef’s bag). Aside from this flour, most 00 flours should work fine.
With Strong White Bread Flour:
Note: Any high protein white bread flour should be a decent substitute for 00 flour. Ideally you want a protein content of around 12% – 14% (sometimes shown as 12g – 14g per 100g). I’ve provided a link to a strong white flour on Amazon below (a large chef’s bag).
Not all the following utensils are required but these are what I use and they tend to make the process much easier.
Any large bowl could be used for mixing the dough but I like using the metal ones since they’re lightweight, stackable, and easy to clean.
Click here to check out metal mixing bowls like the ones I have on Amazon.

These are affordable, easy to use, and precise (accurate to 1g). I don't recommend using cups as measurements as they are inprecise.
Click here to take a look at the type of digital scales I use on Amazon.

These kitchen scales are accurate to 0.01g and are perfect for measuring the tiny amounts of yeast needed for long proves.

Pizza proofing boxes are an excellent investment. They are airtight and they make taking the dough out for shaping very easy.

An infrared thermometer allows you to instantly check the temperature of the stone, ensuring it is within the ideal range.
Click here to check out a pizza peel similar to the one I use on Amazon.

A 12 inch peel is ideal for Neapolitan pizza and makes loading and removing your pizza from the oven really easy.
Click here to check out a pizza peel similar to the one I use on Amazon.

A turning peel is designed for rotating the pizza during cooking. If you're using a pizza oven it should lead to a superior and more even cook.
Click here to check out a pizza peel similar to the one I use on Amazon.

A pizza oven is guarenteed to take your pizzas to the next level. I have an Ooni Karu 16 which reaches 500C/930F and cooks pizza in as little as 60 seconds! A regular oven simply cannot match the cook of a pizza oven. I love my Ooni!

That’s all there is to it! A perfectly shaped pizza. All that’s left to do is to add the toppings and load it into the oven.

The shaping of the pizza is one the biggest keys to great pizza. It is not the easiest step since it requires some practice. However, there are many ways to stretch the dough and it’s just a matter of finding what works for you.
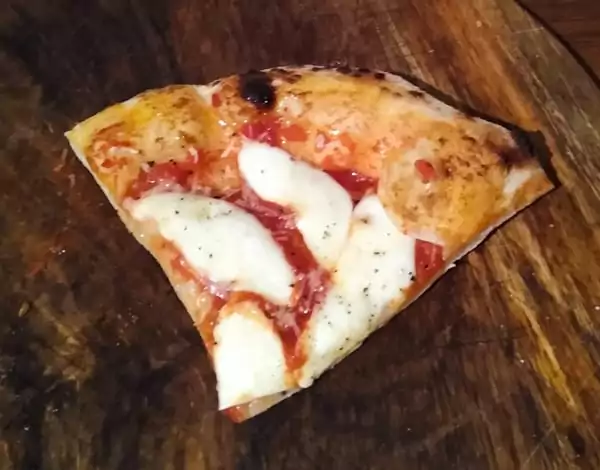
The ideal shape for Neapolitan pizza is thin in the middle with quite large crusts. The technique I’ve showed you in this article is the easiest way I’ve found to achieve this.

Here’s one I made earlier! Pizza shaped Neapolitan style with nice large crusts
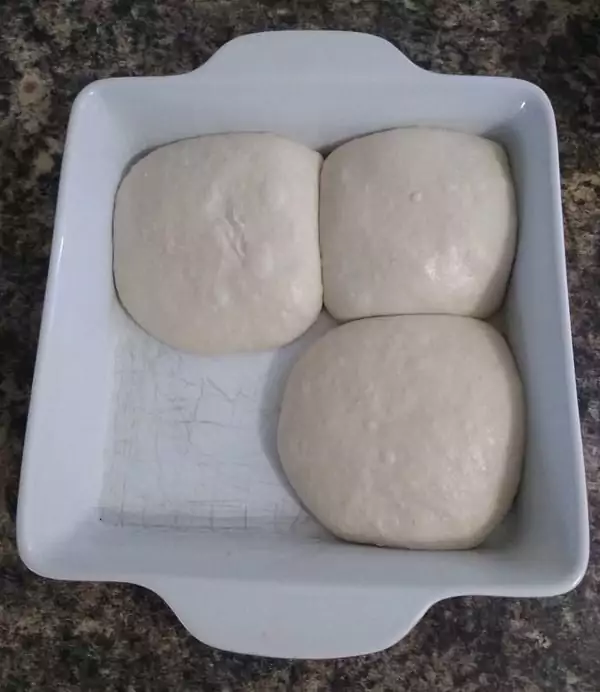
I would recommend making more pizza than you need so you can practice the shaping. Also, when you first start out, you will probably make a couple of poor pizzas before you start to get the hang of the shaping.
By making more dough than you need, you will have plenty of pizzas to practice on. And, it won’t matter if a couple of them don’t turn out so well.
If you missed any of the series before, be sure to check them out below:
Good luck with your shaping everyone!

I’m Tom Rothwell and I’m super passionate about all kinds of homemade pizza! In the last few years I've been on a quest to find the perfect pizza. Now I'm sharing what I've found out with the world!
If you're interested in hiring me for your event in the UK, feel free to check out my website with the link below.
Pizza Catering


I often get asked what type of oven I use for my pizzas. Well, I use a pizza oven made by a company called Ooni.
The range of pizza ovens that Ooni offers is just brilliant. They cover all bases, and all price points. There's affordable and portable models such as the Fyra 12 Pizza Oven and then there's state-of-the-art models such as the Karu 16 Pizza Oven pictured below.
In all honesty, I would say that the oven makes a huge difference. If you're looking to make authentic Italian pizza, a pizza oven is a must.
By clicking the link below and purchasing from Ooni, you would be supporting this website. I've been using their ovens for a long time now and I wouldn't recommend them if I didn't believe in their products.
Time to make some amazing pizza!

I’m Tom Rothwell and I’m super passionate about all kinds of homemade pizza! In the last few years I've been on a quest to find the perfect pizza. Now I'm sharing what I've found out with the world!
If you're interested in hiring me for your event in the UK, feel free to check out my website with the link below.
Pizza Catering


Hi Tom, I’m a beginner when it comes to pizza making and using dough. I’ve tried several different times to create the perfect pizza, but so far I’ve made a lot of mistakes. However, I’m very encouraged after watching all of your videos, and I’m excited to try out your method, which I’m sure will have very different results for me. Thank you for sharing your passion with the world! I’ll keep you updated.
Thank you for the kind words Gordon. Stay tuned because I have a lot more planned for the site!
I have just started making pizza. I roll dough to size I want but it shrinks too small
Hi Kesh, it sounds to me like your dough is underproved. Dough that has not proved enough will not stretch properly and it will not cook properly either – it will tend to make dense pizza.
Be sure to leave your pizza long enough to prove. It should have roughly doubled in size. Also, it should have some small bubbles in it.
Hopefully this helps. Good luck!
With the differences in the yeast amounts, do you recommend one over the other or is the difference due to type of yeast? Or is one a longer proving time than the other? Also, if you do recommend one over the other, I will be making this in a home oven with a stone vs a pizza oven, if one is better for the lower temperature.
Hi Adam, I’ve amended the recipe to read 0.2g – 0.5g. The amount of yeast required will depend on the type of yeast and your room temperature. Check out my pizza dough calculator here to figure out how much yeast you need.
The only difference in using more or less yeast is in the prove time. In general, a 24 hour prove produces about the best results. And it shouldn’t make a difference whether you are using a home oven or a pizza oven. A longer prove should still lead to a better dough.
Thanks for the questions and good luck!